Active Directory Configuration
Audience
Audience: Administrators
Overview
The Active Directory Agent is configured using an XML file (adinfo.xml located in the ADAgent folder).
Standard Attributes
The XML file contains a list of attributes to extract from Active Directory. The base attributes should not be edited; however, you can add additional attributes as needed (by adding an additional 'attr' tags).
<attributes>
<attr>sAMAccountName,PersonID</attr>
<attr>manager,SupervisorID</attr>
<attr>name,Name</attr>
<attr>title,Title</attr>
<attr>department,Department</attr>
</attributes>
Adding Attributes
Open the XML file using any text editor
Add a new line to the file containing <attr>AD_Name,OrgChart_Field_Name</attr>.
Set "AD_Attribute_Name" with the actual AD attribute name and "OrgChart_Field_Name" to the OrgChart field name. For example, <attr>mail,Email</attr>.
Note
New attribute must be added between the <attribute> and </attribute> tags.
Note
Click here for a complete list of attributes available in AD.
Excluding or Including OUs
Most Active Directory deployments contain multiple folder (or OUs) where user records are stored. You must specify which OUs to exclude or which OUs to include. You cannot do both - either exclude or include OUs depending on which is easier (given your AD setup). If you have user records in the 'Users' folder, please note that the 'Users' folder (in Active Directory) cannot be specified in the include list (as it is a special case); however, if you exclude OUs you will get active users located in the 'Users' folder.
Excluding OUs
List which Organizational Units you wish to exclude from the Active Directory. They must be separated by commas.
<excludeou>OU1,OU2</excludeou>
Including OUs
List which Organizational Units you wish to include from the Active Directory. They must be separated by commas.
<includeou>OU3,OU4</includeou>
Note
Any disabled users are excluded by default (regardless of parent OU).
Setting the Destination
After a query to AD is executed, the Active Directory Agent will post the data to a drop folder in your OrgChart account. The following parameters must be configured to fully specify the destination path.
Server Path
See the url as follows. Replace myorgchartserver.com with the server you use to access OrgChart.
<dstsrv>https://myorgchartserver.com/serverside/qactivedirupload.py</dstsrv>
OrgID
To find your OrgID in OrgChart:
Log in to OrgChart.
Click on the OrgChart logo in the top right corner of the screen.
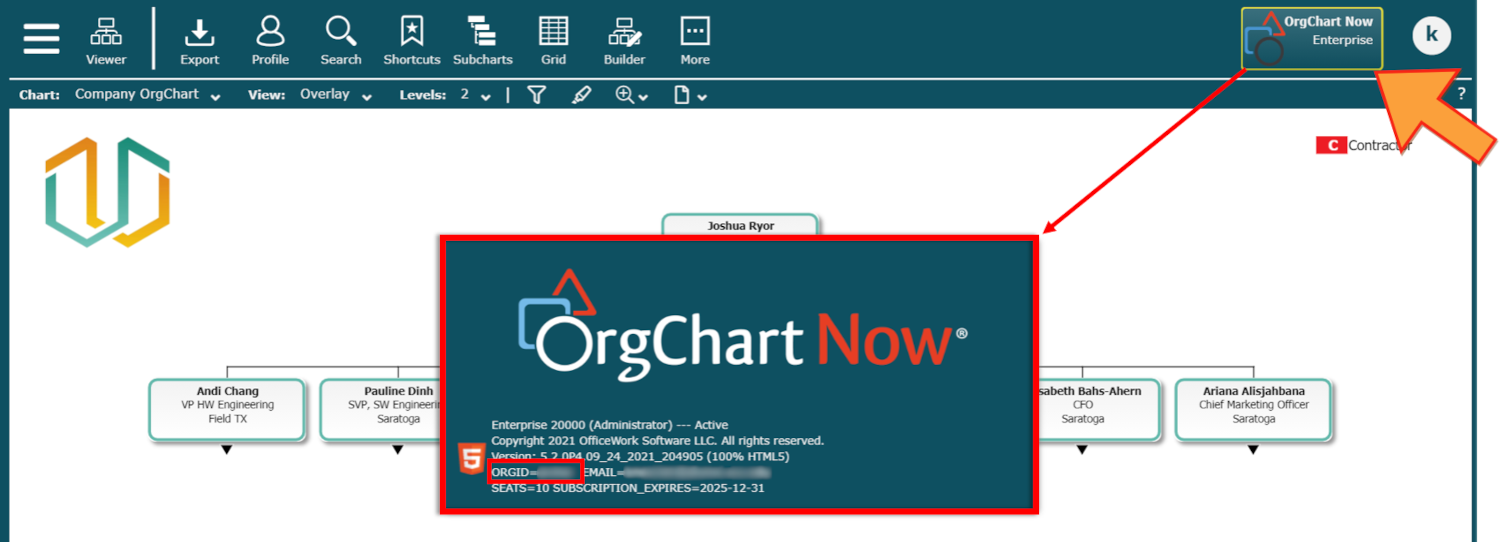
The OrgID is the text listed after ORGID=.
Insert the ORGID into the <dstorg> tag. For Example:
<dstorg>myorg<d/storg>
Destination Folder
For data transfers, set the destination folder (you must have a corresponding folder in OrgChart account):
Replace folder_name with the actual folder name (<data_dstfolder>folder_name</data_dstfolder>.
Example: <data_dstfolder>Data</data_dstfolder>
For photo transfers, set the destination folder. You must have a corresponding folder in OrgChart account with the format AD_[Value specified in tag]:
Replace folder_name with the actual folder name (<photo_dstfolder>folder_name</dstfolder>).
Example: <photo_dstfolder>Photos</photo_dstfolder>
Filename
For data transfer, specify the filename. Make sure to specify the extension (.csv).
Example: <file_name>ad_data.csv</file_name>
Setting the Pass Code
A passcode will be supplied to you with the installer. Contact technical support if you need a passcode. Set the passcode using the <pcode> tag.
Example: <pcode>mypasscode</pcode>
Scheduling
You can configure the AD Agent to send data or photos on a scheduled basis. First, set the scheduling parameters (see below) and then set up the Active Directory Scheduler.
For data transfers, set the day and time for sending data using the 'data_day' tag. The first value is all (for all days of the week) or a specific day (Monday, Tuesday, etc.). The second value is the time to query/send the data (in 24 hour time). All times are relative to the clock on your server.
Example: <data_day>all,22:00</data_day>
For photo transfers, set the day and time for sending data using the 'photo_day' tag. The first value is all (for all days of the week) or a specific day (Monday, Tuesday, etc.). The second value is the time to query/send the data (in 24 hour time). All times are relative to the clock on your server.
Example: <photo_day>sunday,23:00</photo_day>
Generating a Test File
To generate a test CSV file:
Launch Windows PowerShell
Use the "cd" command to navigate to the AD Agent folder
Type "python ad_connector.py -f testfile.txt" and hit Enter.
Make sure it works by finding testfile.txt in the Active Directory Agent folder
If you get an error, contact technical support
Posting Data to OrgChart
To test posting data to OrgChart:
Launch Windows PowerShell
Use the "cd" command to navigate to the AD Agent folder
Type "python ad_connector.py -p" and hit Enter.
You will now find the file in your OrgChart directory.
If you get an error, contact technical support.