Working with Photos
Overview
Employee photos can easily be included in your org charts for display in chart boxes, employee profiles, and search results.
The following article provides information surrounding OrgChart photo integration methods, as well as some general tips for maintaining consistency and image quality. Once you are ready to upload, reference the Photo Integrations article for details about your chosen photo import method.
Photo Integration Methods
There are five ways that photos can be integrated into OrgChart:
Pull photos directly from your HRIS System.
Retrieve photos via URL.
Bulk upload photos using SFTP. Contact OrgChart Support for setup credentials and instructions.
Manually upload photos (individually or in bulk) directly to the file manager.
Formatting and Sizing
Uploaded photos must be in either .jpg or .png format. Photos will automatically be re-scaled and re-sampled when referenced in an OrgChart.
The recommended size for a photo is 150x150; however any size greater than 72x72 and less than 512x512 should work without any issues.
Wide photos are also supported, but are not recommended. Recommended sizes include 100x80 and 200x160 pixels.
Removing Metadata
Depending on the photo integration method, OrgChart may or may not interpret metadata that might be attached to an image.
Metadata (also known as EXIF data), can effect the appearance of a photo in OrgChart, making it appear flipped.
While the photo may appear "normal" in your HRIS system, metadata attached to the photo may force the photo to appear rotated in OrgChart. To avoid this issue, remove metadata from your photos before uploading them to your HRIS system or transferring them to OrgChart.
Reference this article for information on how to remove photo metadata.
Cropping and Centering
Cropping and centering of photos must be completed outside of OrgChart and prior to upload.
Naming Photos
Photos should use a standard naming convention.
The naming convention for photos should be associated with the employee name or PersonID (e.g. PersonID.jpg or employeename.jpg).
Referencing Photos
If photos are named using a standard convention, then they can be referenced dynamically using a concatenate formula. This is the recommended approach (for example, <EmployeeID>.jpg is a commonly used convention).
If photos are not named using a standard convention, then a Photo field in the source data must be used to reference a photo. The Photo field can either be a URL or a folder/file reference. Some examples include:
fredsmith.jpg | "Photos" directory is searched to retrieve the named photo. |
CompanyPhotos:fredsmith.jpg | "CompanyPhotos" directory is searched to retrieve the named photo. |
http://www.exampleURL.com/jsmith.jpg | The URL is resolved to a photo. |
Import Photos with Excel
If you are importing an Excel spreadsheet, you can add a column called "Photos". This column should be populated with a photo reference.
The following formats are supported:
Photo.jpg (for example: "12555.jpg") | This format will search the "Photos" directory for a referenced photo. |
Directory:Photo.jpg (for example: 'MyPhotos:12555.jpg') | This format will search the specified directory for the referenced photo. |
Photo URL (for example: 'http://{yourwebsite}/photos/12555.jpg) | The URL will be resolved to a photo. |
Missing Photos
If a photo is missing, OrgChart will show a silhouette image instead of an employee photo. You can replace the default "missing.jpg" with your own missing photo, if desired.
To do so, upload a .jpg of the image you would like to use to the File Manager. Then, delete the existing missing photo file, and rename the newly uploaded photo Missing.
OrgChart refreshes photos every 7 days. If you have updated a photo, and you do not see the change reflected after refresh, you can force OrgChart to pull your photos immediately. The following section provides step-by-step instructions for on-demand photo refreshes.
Log in to OrgChart.
Use Builder to generate a chart document of the Master Chart for which you would like to refresh employee photos.
Click on the the
 icon in the Workbench toolbar. The Document Settings: Changes panel is displayed by default.
Click on the Advanced tab in the left side menu.
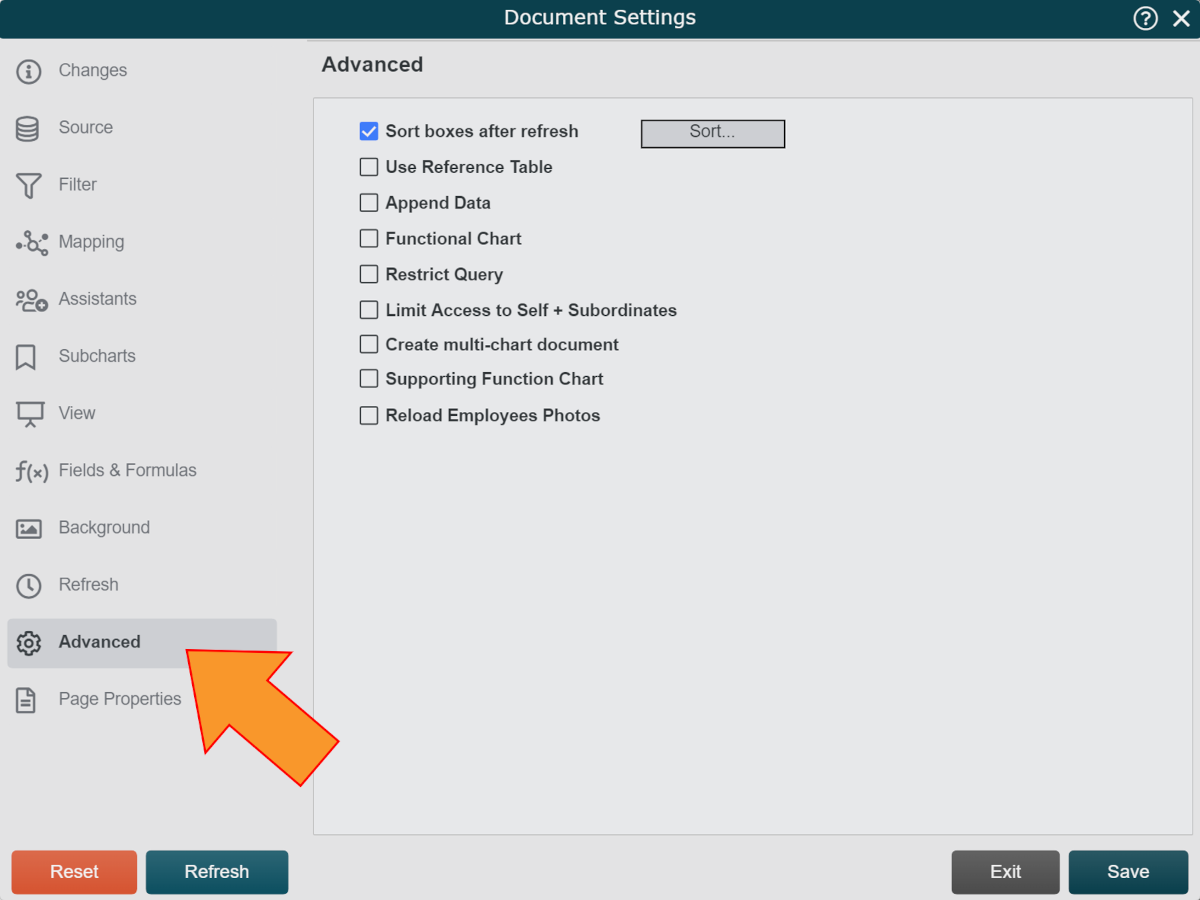
Check the Reload Employee Photos check box, click Save, and then click on Refresh.
Note
To refresh a single employee photo, right-click on the photo (either in the chart record, or in the Profile), and then select the Reload Photo option.