- OrgChart Overview
- Quick Start Guides
- Top Toolbar
- Viewer
- Directory
- Planning
- Point in Time
- Workbench
- View Manager
- Chart Settings
- Account Settings
- Connectors
- Append Data Connectors
- Merge Data Connectors
- Photo Integrations
- Active Directory
- ADP
- ADP Recruitment
- Append Table
- Azure AD
- BambooHR
- Breathe HR
- ClearCompany
- Cornerstone
- CSV
- Dayforce
- Excel
- Google Directory
- Greenhouse
- iCIMS
- Jobvite
- Lever
- Namely
- Oracle
- OrangeHRM
- Paychex
- Paycom
- Paycor
- Paylocity
- PaySpace
- PeopleHR
- Sage
- Salesforce
- SFTP Pull
- Signify
- Subscribe HR
- SuccessFactors
- TriNet
- UKG
- UKG Pro
- Unicorn HRO
- Workday
- Append Data Connectors
- Topics
- Admin User Impersonations
- Automatically Export to SharePoint
- Auto-Assignment Example
- Auxiliary Reporting
- Co-Head Example
- Creating a Master Chart
- Creating a Master Page
- Creating Shortcuts
- Dynamic Localization
- Flat File Prep
- Formulas
- Functional Charts
- Import Filters
- Index Page
- Inverted Charts
- Level Charts
- Multi-Chart Documents
- Pie Chart Example
- Point-in-Time Charts
- Restricted Link Setup
- Security Profiles
- SSO Configuration
- Release Notes
- Troubleshooting
- Legal
- Contact Us
UKG Pro Configuration
Audience
Audience: Administrators
Overview
The UKG Pro connectors allows administrators to import UKG Pro data directly into OrgChart Now. To get started, an administrator must open an Administrative Case with the Administrative SaaS Team in order to add the BI Consumer (Core) role to your report. Additionally you will need set permissions for the BI Consumer (Core) role to read, execute, and traverse the following:
The employee report
The folder where the employee report is stored
The parent folder
Configuring an UKG Pro Connector
Log in to your UKG Pro account.
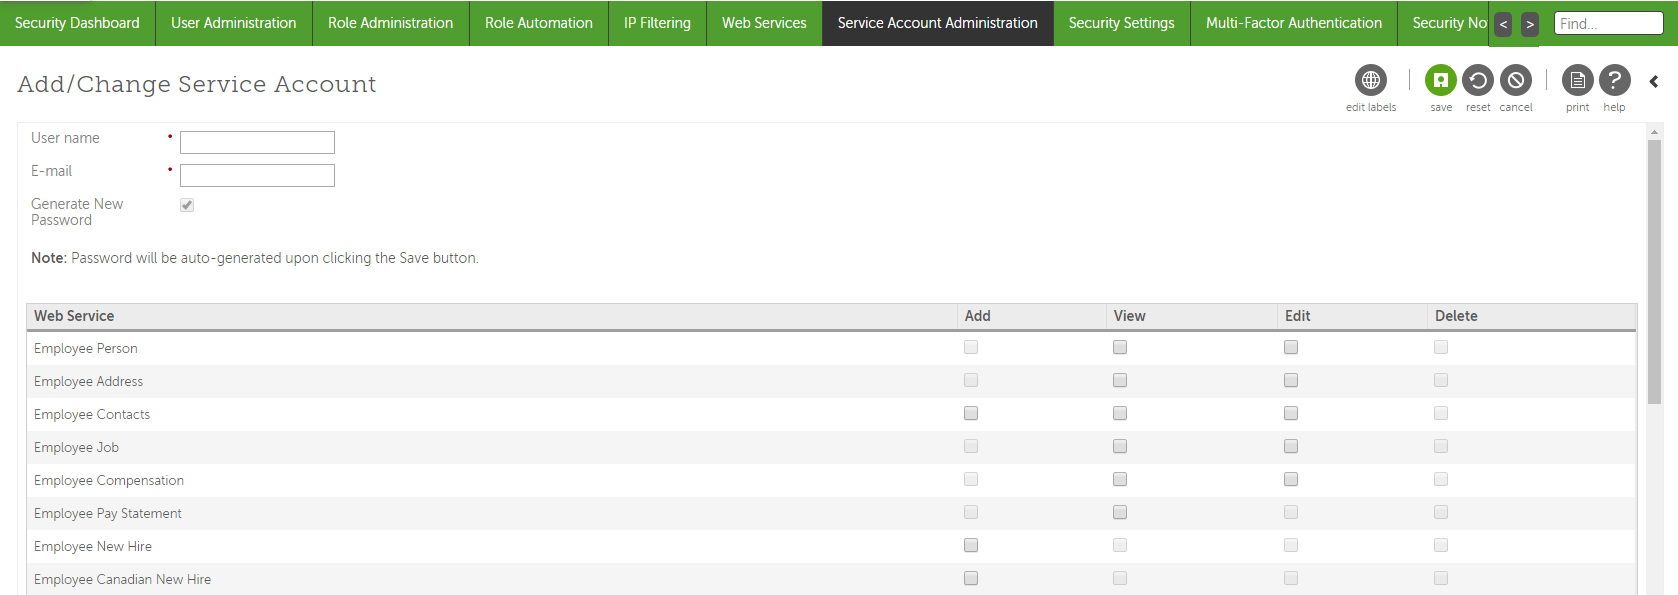
Select the System Configuration tab, and then select the Service Account Administration option.
Click on the + button to add a new API Service User account.

Enter a user name (Typically this would be your AR number followed by "_OrgChartNow. For example: ABC1001_OrgChartNow).
Enter an email address (typically the administrator's email address).
Check the Generate New Password checkbox. The password will be auto-generated after clicking Save.
Check the View checkbox associated with the following required fields:
Employee Person
Employee Job
Employee Employment Information
Before continuing to the next step, make sure that you have a record of the following information:
Click Save in the upper right corner.
Click on the System Configuration tab, and then select the Web Services option.
Look for the Business Intelligence web service endpoint. Note the first part of the endpoint address, i.e. "service4."
Select the Business Intelligence tab.
Create a new folder called "OrgChart."
Create a report, and then name this report "OrgChart Employee Report."
Note the Report Path starting at zzzCompany Folders (i.e. zzzCompany Folders_Acme Inc_UKGPro_IT Reports_OrgChart).
Include (at least) the following required fields in the report:
Employee Name
Employee Number
Supervisor Employee Number
Job Title
Org Level 2 - Department Name
Org Level 2 Code - Department Number
Employment Status
Employee Type
Set the properties for the report.
Make sure the report is filtered on Active (and if needed LOA employees).
Select the Permissions tab, and ensure the following is true:
The report has the BI Consumer (Core) role.
The Override the Access Permissions Acquired from the Parent Entry checkbox is checked.
The BI Consumer (Core) permissions are set to Read, Execute, and Traverse.
